Customising Shelves
Shelves, Marking Menus and Hotkeys are designed to allow you to customise the Alias interface to suit your needs.
Well-meaning colleagues may urge you to copy their shelves (we all think we've got the best way of working...) Take a look at theirs to get ideas, but you should build up your own shelves, over time, as you get experience with Alias.
It's normal for users to have very different preferences in the way they work. This ability to customise can make huge differences to the comfort and efficiency of your modelling, so take the time to get them right, and don't be afraid to change and improve them as your Alias skills grow.

Tools for Working with Shelves
The following are the main tools and techniques for creating your own shelves:
- Middle mouse button to drag a tool from the Palette or the Menu onto the shelf.
- Middle mouse button to drag a tool into the Trash, or to re-position it on the shelf.
- Use CTRL double click to rename a shelf tab, or a tool. This is important if you have multiple versions of one tool with different settings.
- Use ALT double click to save an image of the tool icon that you can repaint to create your own icon. (Rarely used)
- Use Preferences → Interface → Palette/Shelves Layout to fix a location for the shelves.
- Use Preferences → Interface → Shelf Extras to help design the shelf layout. Use the middle mouse button to drag 'spacers' onto the shelf:

For more information, access the Help for the shelves using the right mouse button on the shelf title bar.

Recommendations for Designing Shelves
There are three main reasons for adding tools to a shelf:
- The same tools with different settings...

- Opening out a whole toolbox along a shelf...

- Avoiding pull-down menus for tools that you use often. For example - trim and untrim

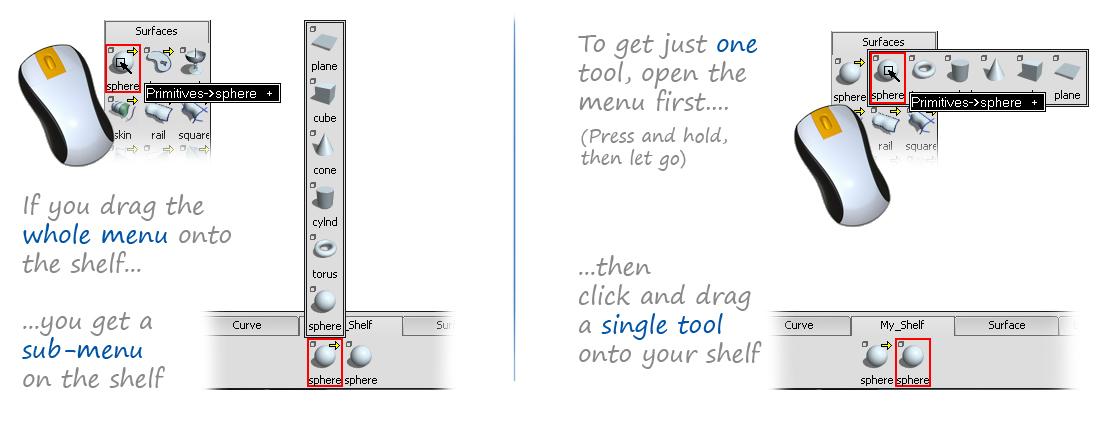
Note: Single-Tools and Sub-Menus
Be careful to choose either a whole menu, or just a single tool when dragging tools onto the shelves.

Saving Shelves
Once you have added tools and tabs to the shelves, you must save them:

To save the shelf as the default shelf, AND all other changes to the interface:
- Right-click on the Shelf title bar to Save the shelf set and name it.
- Use Preferences → User Preferences → Save.
To save only the changes to the shelf as the new default shelf
- Right-click on the Shelf title bar to Save the shelf set and name it.
- Use Utilities → Tool Resets to return all other changes to their saved or default settings. Be careful NOT to reset the shelves.
- Use Preferences → User Preferences → Save.
OR...
- Right-click on the Shelf title bar to Save the shelf set and name it.
- Exit Alias without saving preferences.
- Start Alias, and load your saved shelf set into the shelves (use Replace Shelf Set from the shelf menu)
- Use Preferences → User Preferences → Save straight away.
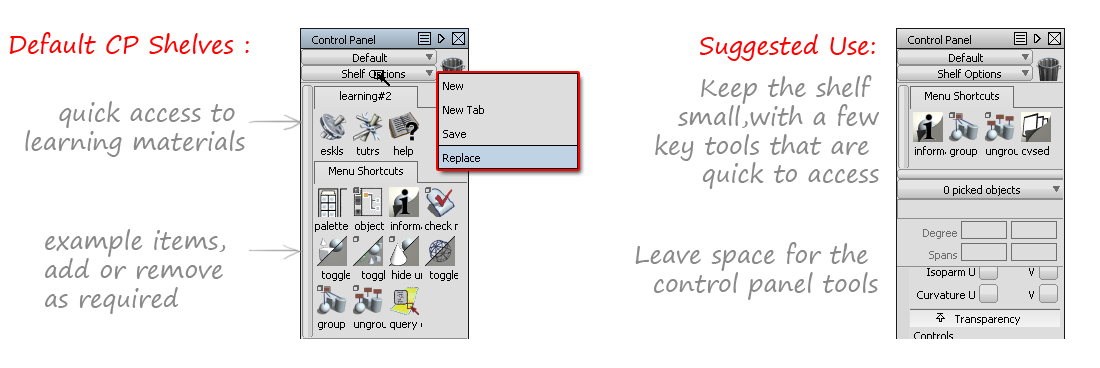
Control Panel Shelf
The Control Panel shelf works exactly the same as the main shelf, it just offers a second, smaller area for customisation.
The shelf is specific to the four Application Modes, and will change when the modes are changed.

